Test Suite Howto
Design
The ABINIT test suite is a collection of input and output files organized in a hierarchical structure of directories. Each directory contains tests sharing some kind of property such as the ABINIT major version in which the test was added or the external libraries whose presence is required for the execution of the test.
The purpose of the test suite is two-fold: developers use the test farm to validate their code before pushing their developments to the trunk whereas users can use the test suite to validate the executable before using it for production calculations.
The code that drives the execution of the tests and the validation of the final results in written in python (version >= 2.7 is required) and relies on the following principles:
-
Each test is self-describing, in the sense that the input file provides all the information needed to run the test and analyze/validate the final results.
-
Each test has keywords so that it is possible to select and run only the tests containing these tags.
-
It should be possible to run the entire suite in parallel with MPI/OpenMP and an arbitrary number of processors (not only the tests in the paral directory)
-
The execution of the tests can be distributed among python processes in order to reduce the execution time.
Configuration files
The configuration parameters of the test suite are defined in the __init__.py
files located in the test suite directories.
These files are standard python files and the parameters are specified with the standard python syntax
for list of strings.
tests/__init__.py is the top level configuration file.
This file defines the list of directories containing the ABINIT tests:
cat tests/__init__.py

testsuite_dirs = [
    "atompaw",
    "bigdft",
    "built-in",
    "etsf_io",
    "fast",
    #"cpu",  <<< disabled
]
To add a new directory to the test suite, it is sufficient to add its name to the python list.
Each directory listed in testsuite_dirs contains an additional __init__.py file
with the list of input files associated to the tests and (optional) global attributes::
cat tests/libxc/__init__.py

# CPP variables
need_cpp_vars = [
    "HAVE_LIBXC",
]

# List of input files
inp_files = [
    "t00.in",
    "t01.in",
    "t02.in",
    "t03.in",
    "-t11.in", # Disabled
]
inp_files is the list with the names of the input files contained in the Input directory. One can prepend a dash to the name of file (e.g. “-t11.in”) to signal to the python code that this test has been disabled.
The variable need_cpp_vars is a list of CPP variables that must be defined
in the include file config.h in order to activate the tests in this directory.
In this case, for example, the libxc tests are executed only if HAVE_LIBXC is defined in config.h.
Note that one can prepend the character ! to the name of the CPP variable to specify that the tests
should not be executed if the variable is not defined in the build.
Each input file contains all the information needed to run the test and to analyze the final results. These meta-variables are gathered in the TEST_INFO section.
Conventions
This paragraph summarizes the conventions used for the names of the tests. The ABINIT tests are grouped in suites whose name is given by the name of the directory as specified in tests/__init__.py. Each suite can be optionally divided into sub-suites whose names must be registered in dirname/__init__.py To each test is therefore assigned a suite, a sub-suite and an integer number (>= 0)
Important
The name of the suite/subsuite must be unique.

The organization in terms of suites/sub-suites allows one to select easily the tests
with the command line interface runtests.py.
The name of the input file must match one of the two possible regular expressions:
- t[integer].in e.g.
t11.in - t[subsuitename]_[integer].in e.g.
tgw1_1.in
The latter syntax is used, for example, in the tutorial directory to group the tests associated to a particular lesson. The name of sub-suite can be passed as argument to runtests.py to specify that only the tests in that particular sub-suite should be executed.
For example, the command:
runtests.py gw1[1:3]
will run the tests tgw1_1.in, tgw1_2.in.
Warning
Each test has a standard input, a standard output and a standard error whose names are tgw1_1.stdin, tgw1.stdout, and tgw1.stderr, respectively. These names are constructed automatically by the python code hence developers should avoid creating similar file names in the Fortran executables at runtime.
The TEST_INFO section
Each input file contains, in addition to the parameters passed to
the Fortran code, an additional section (<TEST_INFO>) that provides all the
information needed to run the test and to analyze the final results.
The <TEST_INFO> section is placed at the end of the input file
in order to avoid problems with executables reading from standard input.
The XML-like markers <BEGIN_TEST_INFO> and <END_TEST_INFO> enclose the section.
Each line starts with the sentinel #%% that will be removed during the parsing.
What is left is a standard INI configuration file providing all the information
needed to run the test and to analyze the final results.
The figure below shows how options are grouped in different sections:

A simple example of TEST_INFO section is reported in the figure below:

Note that tokens are separated by a comma (e.g. tolabs=1.0, tolrel=0.0), while fields are separated by a colon
Tip
Use testlint.py to validate a new TEST_INFO section
Important options
This paragraph discusses in more detail the most important options present in the TEST_INFO section. For the complete documentation of the options, one can execute the script tests/pymods/testsuite.py.
- executable
- The name of the binary file e.g. abinit (mandatory)
- max_nprocs
- the maximum number of MPI processes that can be used (mandatory)
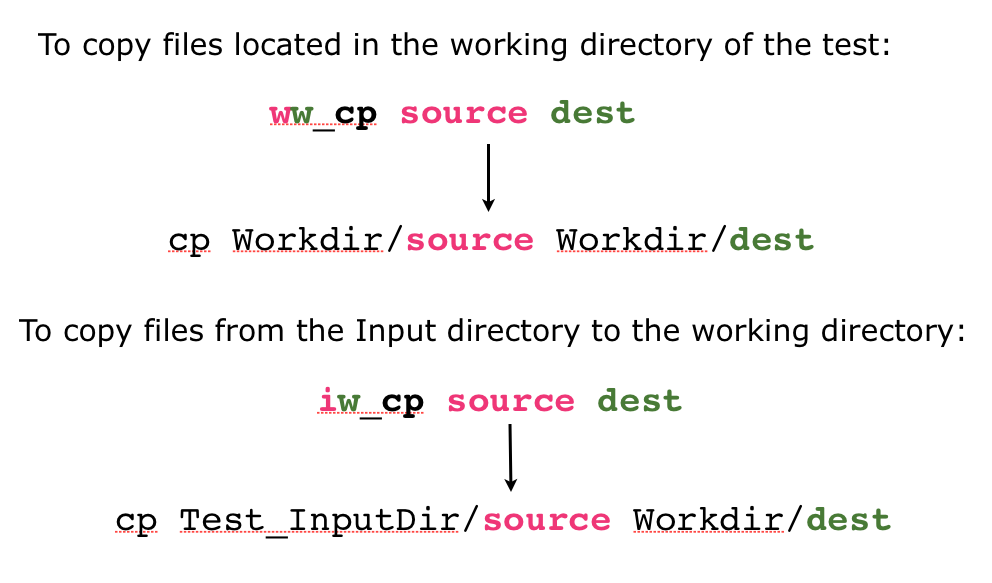
- pre_commands and post_commands
-
List of shell commands ([shell] section) that are executed before and after running
executable. At present only the commandscp,mv, andtouchare supported. Since the python code uses absolute pathnames to deal with files, one has to specify where the files are located (we cannot use relative paths as the python function os.curdir is not thread-safe).- i → input directory
- p → Pspdir
- w → Working directory (the directory where the test is executed)
Example: ww_mv foo bar corresponds mv workdir/foo wordir/bar while iw_cp twan.in wannier.in corresponds to cp Input/twan.in workdir/wannier.in
- keywords
- List of keywords that can be used to select the tests.
Note that the name of executable is always added to the list
of keywords, hence
runtests.py -k cut3drun all the tests associated to the executablecut3d
Chained Tests
In some cases, one has to connect different steps. A typical case is depicted in the figure below:

In this case, test t95.in produces a density file DEN that is needed to start the second calculation in test t96.in. The python code must be aware of this dependency so that t95.in and t96.in can be executed in the correct order.
The TEST_INFO section defines the option test_chain with the name of the tests forming the chain. The sequence is ordered in the sense that the python script will execute the tests starting from the first item of the list.
Note
All the input files belonging to a test chain must contain the test_chain option (obviously with the same list of tests)
During the execution of a test chain, one usually has to perform basic operations such as file renaming or file copying in order to connect the different steps (for example, we may want to rename the DEN file produced in t95.in so that the output density is automatically read in test t96.in). The shell section contains two options that are used to specify the list of shell commands that are executed before and after running the test. A typical example is shown below:
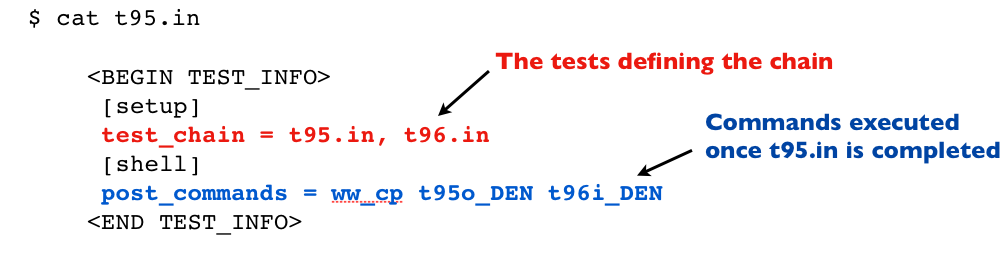
Note the peculiar syntax for the shell commands:
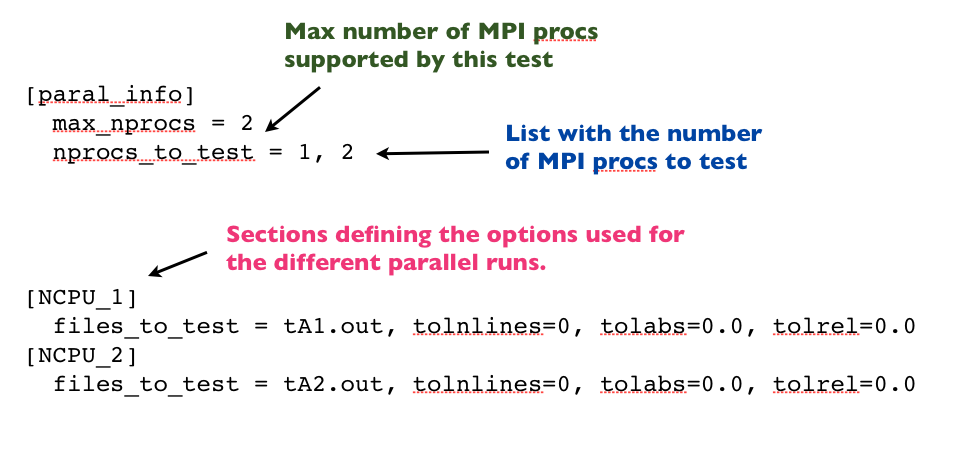
Multi-parallel Tests
A multi-parallel test is a test that can be executed in parallel with different numbers of MPI processes (e.g. the tests in tests/paral). The ABINIT test suite is designed so that it is possible to define a single input file from which multiple parallel tests are automatically generated. In what follows, we describe how to specify a multi-parallel test in a TEST_INFO section.
The most important option is nprocs_to_tests (defined in the [mpi] section)
that lists the number of MPI processes to use for the different tests.
max_nprocs is the maximum number of MPI processes
that are supported by the calculation (just set it to the maximum value present in nprocs_to_test)
Then for each possible number of MPI processes we have a section whose name
is constructed with the rule: NCPU_#nproc.
A simplified example of TEST_INFO section for a multi-parallel test is reported below
How to run the tests
The abinit/tests/runtests.py script provides a user-friendly command line interface that allows the user to select tests by keywords, authors, suite name, input variables etc. It also provides options for controlling the number of MPI processes, the number of OpenMP threads as well as the number of python threads (task parallelism).
The syntax is:
runtests.py [suite_args] [options].
where suite_args is a list of suite names that can be optionally selected (sliced) using python syntax.
For example:
runtests v3[:4] v4[45:] v5[3]
executes all the tests in v3 from 0 up to 4 (excluded), all the tests in v4 starting from 45 and v5/t3
Warning
If suite_args is not given, the script will execute the entire Test suite.
The most useful options are:
- -j
- specifies the number of python processes (task parallelism)
- -n
- specifies the number of MPI nodes for e.g. abinit
- -o
- specifies the number of OpenMP threads for e.g. abinit
- -k
- selects tests by keywords
Tip
For the complete list of options supported, use runtests -h
How to run tests with MPI
In the simplest case, one can run MPI tests by just issuing:
runtests.py -n 2 paral
where n specifies the number of MPI processes. runtests.py employs very simple rules to guess the MPI implementation to be invoked. In particular, it assumes that:
-
The environment is properly setup (PATH, LD_LIBRARY_PATH)
-
MPI demons (e.g. mpd) are already running in the background (you have to initialize the demon manually before launching the tests)
-
It uses the mpirnuner in PATH (default: mpirun) and assumes the standard syntax for specifying the number of processors (i.e. mpirun -n 4 executable < stdin > stdout)
If you need to override the default settings, you can pass options to the script via a configuration file in the INI format (-c options):
runtests.py -n 2 -c mpi.cfg

cat mpi.cfg

    [mpi]
      mpi_prefix = /usr/local/openmpi-gcc47/
      mpirun_np = %(mpi_prefix)s/bin/mpirun -np
mpirun_np is the string with the path to the mpirunner, followed by any additional option you may want to use. The option used to specifying the number of MPI nodes that must be added at the end of the string.
Tip
For more examples, consult the configuration files in abinit/tests/mpi_cfg.
How to run testbot.py on a buildbot slave
This section is intended for developers who may want to run interactively the entire test suite on a slave builder (example: one or more tests are failing on a slave. You have already modified the source code to fix the problem and you want avoid to launch a full buildbot build just to check that your changes are OK)
In this case, one can re-rerun the entire test suite (or part of it) by just executing the following two steps
cd abinit/tests
testbot.py
The script testbot.py reads the configuration file testbot.cfg (already present in the working directory),
runs the entire set of tests and produces the final report.
Note that one modify the configuration options defined in testbot.cfg in order to speed-up the execution of the tests.
In particular one can use the options:
# with_tdirs = list of directories to execute
# without_tdirs = list of directories that will be excluded
How to add a new test in the test suite
In order to introduce a test, one needs to:
-
Provide a new input file in e.g. tests/v9/Input (or modify an existing one, possibly in another directory, but please do not suppress the existing capability testing!).
-
Provide a new reference file in the corresponding tests/v9/Refs, that might possibly come from your machine, but better (it will avoid problems with tolnlines, see below) from the reference machine currently present in the test farm (alps at the time of writing).
-
Insert the test in the list of tests to be done, by adding its name in tests/v9/__init__.py.
-
Document the test by adding a commented section inside the input file (edit an existing input file to follow its style).
-
Declare the pseudopotentials, the flow of actions, the files to be analyzed, the tolerances for the test, inside this documentation. For the tolerances, start with
tolnlines = 0, tolabs = 0.000e+00, tolrel = 0.000e+00
The different fields control how strictly the test results will be analysed:
- tolnlines is the maximal number of lines found to be different between the output and reference file (within a rough tolerance that can be tuned by the option opt=-medium, opt=-easy or opt=-ridiculous, see the added section in other input files).
- the maximum floating point difference found must be less than tolabs, for each line individually,
- the maximum relative difference must be less than tolrel, for each line individually.
If this procedure fails, contact the code maintainers in order adjust the test case. This might mean modifying the tolerances files. Unless you are really expert, let the maintainer do the final adjustment.
Important
Please, try to keep preferably the total time per test case to less than 10 seconds. 30 seconds is a maximum for most test cases. Going being this needs exceptional reasons.
Supposing now that you have introduced a new test case. It can be used, with the other tests of the ABINIT test suite, through different channels:
-
these tests can be triggered on the test farm Web Page.
-
locally (on your machine), the whole set of sequential tests, or particular tests or series of tests, can be triggered by issuing, in the ABINIT/tests directory, the command ./runtests.py. (see the many capabilities of this scripts by issuing ./runtests.py –help). Other sets of calculations can be triggered, as described by issuing make help. The result will appear in a new subdirectory Test_suite
Last but not least: are you sure that your modifications do not deteriorate the performance of the code in the regime where your modifications are not used? You should inspect your modifications for both memory use and CPU time.
Adding a chain of tests is slightly more involved, and imply to
register the name of the sub-suite to the list of sub-suites in __init__.py
(this step can be skipped if the test does not belong to a sub-suite)
Warning
The code uses a pickle file (test_suite.cpkl) to store the set of objects representing the tests of the test suite. Remember to regenerate the database after any change to the TEST_INFO section or any modification of the configuration parameters of the test suite (__init__.py files). runtests.py provides the handy option -r (regenerate) to automatically regenerate the database before running the tests.
How to add support for a new executable
Let’s assume that you have a new executable named foo.x and you want to change the python code so that the results of foo.x are automatically tested. What are the modifications needed to integrate foo.x in the ABINIT test suite?
First you have to provide an input file for foo.x with a
<TEST_INFO> section that provides all the information needed to run the executable.
If foo.x requires some kind of input data or extra rules that are not supported,
you will have to modify the parser so that the new options are stored in BaseTest.
Then you have to tell the code how to construct the standard input that will be passed to foo.x. This is the most complicated part as it requires some understanding of the internal implementation.
The code uses three different objects:
- BaseTest
- ChainOfTests
- TestSuite
to represent the tests of the test suite.
BaseTest is the base class that provides methods to run and analyze the results of the test (you should try to reuse this piece of code as much as possible).
ChainOfTests is a list of BaseTest instances that cannot be executed separately. Typical example: t1.in produces an output result that is used as the input of tests t2.in.
TestSuite is a list of (BaseTest, ChainOfTests) instances and provides user-friendly methods to extract tests according to some rule (e.g. keywords) and to run these tests with Python threads.
The BaseTest class provides the make_stdin method that returns
a string with the standard input that should be passed to the Fortran executable.
Since each executable has its own format for the input file, the BaseTest is not able to handle all the different cases.
Hopefully, you only need to replace the make_stdin method of BaseTest
so that the appropriate standard input is constructed from the values specified in the <TEST_INFO> section.